• about
  • contact
  • blog
jordan fretz design | freelance graphic design & art direction | branding & logo design
  • about
  • contact
  • blog

WOULD HAVE BEEN THE BEST BARTER EVER

I love to barter, but this one didn't have a chance :). I may never have a custom home, but I'd like to design for more custom home builders. Fairview wanted a mark that would convey a home and feel more modern than their previous design (before a name change). Currently their brand mark was a multi-colored home and didn't have that high-end/professional look that they were looking for.

Rarely have I done real client projects that seem to combine two really interesting names, like "Monkey Cafe" which I just googled and yes there is a "Monkey House Cafe" in existence.  Those interesting names can really spark creative designs. The challenge with a logo like this is creating a mark that is interesting and can be the essence of a home, but not be super literal and dull.

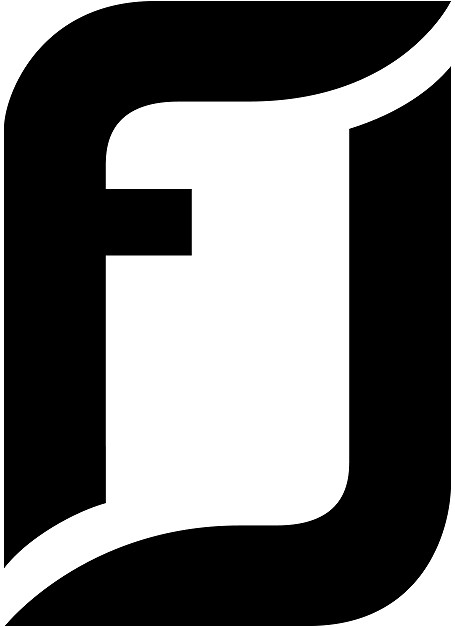
After a bunch of sketches and after exploring a few different directions, we liked how an "F", when tipped over appears to make two peaks of a roof. It's a very simple solution and could be used in some interesting ways in identity and future branding. The next step was finding the right balance of "F" to roof lines and the correct weight for the logo. 

jordan-fretz-design-sketches.jpg
custom-home-builder-logo-design-mark-concepts.jpg

Multiple type styles were also explored and while the Sans Serif type gave a very modern look, Fairview had previously incorporated a script into their design and a serif type style seemed to be a smooth transition. I altered the type slightly with some added kerning and extended the leg of the "R" as it transitions down to "custom homes". In the final execution, I also changed from the original black and gold color scheme I showed to a navy blue and gold. It was a little less harsh and I liked how established the final layout looks.

fairview-final-tweaks-to-custom-homes-logo-design-2.jpg
tags: real estate logo, real estate logo design, builder logo design, custom home builder logo design, jordan fretz design, custom home logo, high-end real estate logo, high end real estate logo, real estate logo designer
Wednesday 04.04.18
Posted by Jordan Fretz
 

BABIES ARE AWESOME

mmmm.jpg

Mercy Community Crisis Pregnancy Center is a great non-profit in Reading, PA. They help council and assist young mom's in need and show the love of Jesus to struggling families. Mom's in need can go to Mercy and get everything from baby wipes, to diapers, to some life advice. What an awesome ministry! Volunteers and donations really help make their ministry possible and like many ministries that have been around a long time, they needed a bit of a refresh with their brand, starting with their visual identity.

"Crisis Pregnancy Center", while being a descriptive part of the logo seemed to be a little wordy. Also, "Crisis" itself has a bit of a negative connotation to it and the simplicity of "Ministry" really seemed to get to the heart of what Mercy wanted to communicate. They exist to minister to the community and families in need. When a young mom comes needing help, yes, they can provide some support with the physical needs of baby products, but also encouragement and advice at a time when they really need it. 

Mercy also was taking over an additional space in another area of reading. The building was a real fixer-upper, but has come a long way with donated time and volunteers to be a great space for supporting couples new to parenting. With the addition of the new building, there was additional questions on how to brand the new building. Should that be connected to the Mercy Ministries logo or branded separately. The new building name was a combination of the location and a verse that fit the ministry. After multiple conversations and emails back and forth from PA, I started developing concept designs for the umbrella of Mercy Ministries and then also the 921 Center.

11.jpg
17.jpg
jordan-fretz-design-mercy-ministries-identity-materials-1.jpg

As you can see, the center logo design was chosen (originally it was in a slightly different color scheme). In addition to the logo design, I designed a donations brochure for the 921 Center that would be a part of a launch package of materials. I really liked "The Room to Grow Campaign" name the Mercy team came up with and I thought using the combination logo (includes the mercy center family icon) to kick off the 921 Center would help connect the new project to the Mercy Ministries brand. The combination logo will also be used on signage for the new building. Typically the independent logo will be used, but in the launch I would like to get some awareness built around that family icon.

Also below is a glimpse at the Brand Standards Guide I put together for the new identity. I can't explain how nice that is to have for a brand that most likely will involve many different vendors and designers assisting on projects. One problem with many ministries or small businesses in general is that people come and go and nobody remembers who worked on what, where the original files are, and somehow they only have a pixelated version of their logo embedded in a word doc. Besides providing organized vector and raster filetypes that include full color PMS versions, grayscale versions, one color versions and reversed versions, I provide a description of each filetype and best practices for using each. The brand guide clears up spacing, what can and can't be done with the logo in marketing materials, color profiles, complimentary typefaces and examples of marketing materials that showcase how the brand should look. Anyway, I hate hearing businesses get toasted by either hiring a designer that doesn't give them any information because it's really valuable for any company rebranding.

jordan-fretz-design-mercy-ministries-identity-materials-3.jpg
jordan-fretz-design-mercy-ministries-identity-materials-2.jpg
tags: ministry logo design, logo designer, non-profit logo design, ministry brochure design, logo brand guidelines, graphic design, ministry branding, jordan fretz design
categories: Graphic Design
Saturday 03.24.18
Posted by Jordan Fretz
 

JUST TELL ME WHAT I OWE YOU

There are two ways of thinking when it comes to how a designers branding looks.

1. Why should a customer trust me to design for them if my stuff doesn't look polished? How can a customer trust me to design amazing stuff for them when I don't even do it for myself? How am I going to give advice on branding and convince someone to invest in quality design, when I don't invest/put the time into it myself?

2. I design non-stop for other businesses, events, causes, sports teams, etc. and trying to make them look good that I put very very very very little thought or time into my own brand. As far as I'm concerned my own branding should look terrible or sooooo simple that when someone asks why my work isn't polished, I say "it's because I focus all of my time into my client's projects and making them successful that I put zero time into my own brand."

The truth is probably somewhere in the middle. I don't get much time to think about the way my stuff looks. Also, for some reason it's difficult to make designing for myself a priority, and in talking to other designers, many of them have the same problem. Ideally though, I have thought and creativity in everything I show or do for my own branding.

jordan-fretz-design-invoice-template-layout-design-03.jpg

What could be more boring than an invoice? No-one wants to get them, pay them or look at them (maybe accountants do I guess, who knows). Anyway, my invoices looked probably pretty similar to everyone else'. Simple, professional, gets to the point and shows the numbers. There is nothing wrong with that and I haven't had complaints, but recently I wanted to updated them.

I made a template that looks like a Pantone color swatch. I figure the info is still easy to navigate, but I can update the color and Pantone swatch name every couple months or something. Anyway, I have only sent a couple out so far, but hope it makes a client smile at some point. Even if they don't exactly love paying an invoice :).

tags: invoice design, graphic design, creative invoice, designer invoice, invoice template design
Monday 03.19.18
Posted by Jordan Fretz
 

CARDBOARD CHARCOAL PORTRAITS & DRAWINGS

I love nothing more than a new identity, branding or advertising challenge. However, creating art is a close second. It's great to be able to break up all the computer work with art in the evenings here and there or over a weekend. I remembered having really enjoyed drawing on brown paper once before in the past ,with then pencil (H's to B's) and using a white piece of chalk. I've always been amazed by charcoal artists using just a stick of charcoal and achieving such incredible levels of contrast in their art. After watching a few videos and getting some charcoal pencils, I grabbed a piece of cardboard from the garage and started testing my skills. Brown paper is great, but cardboard adds a texture and it's stiff enough that I can just hold it in my lap without any backing board (super convenient). Using a black pencil, white pencil, kneaded eraser and q-tips for blending, I was able to create some detailed artwork with little expense. I started an Instagram page showing some of my work (@jordanfretzart) and plan to create some advertising with future drawings. I have shown a .gif below showing one of my portraits come to life and I am still experimenting with the best ways to preserve/show off the work. Getting off the computer in the evenings has sparked added creativity and inspiration for current projects. I encourage any designer to do it whenever they can and experiment with new mediums. A few last bits of advice: don't over-erase on the cardboard, don't use too much force with your pencils as it will create impressions/dents and keep your wife's cat away from smacking the pencil you're using.

Cardboard Charcoal Portrait Drawing Process
Cardboard Art, Charcoal Portrait Drawing
Cardboard Art, Chalk Bird Illustration
Cardboard Art, Charcoal Portrait Drawing
Cardboard Art, Chalk Panda Bear Illustration
Cardboard Art, Charcoal Portrait Drawing
Cardboard Art, Charcoal Drawing
Cardboard Art, Charcoal Portrait Drawing
tags: cardboard art, cardboard, cardboard portrait, charcoal portrait art, charcoal portrait, portrait artwork, portrait drawing, charcoal drawings, charcoal, portrait, pencil drawings, 2d artwork, jordan fretz, jordan fretz artwork, commission artwork, charcoal art, charcoal artwork, charcoal sketches, charcoal drawing, charcoal on cardboard, creative cardboard, drawing process, charcoal process, charcoal illustrations on cardboard, charcoal illustrations
categories: Artwork, charcoal drawing
Thursday 01.18.18
Posted by Jordan Fretz
 

DMDS UGLY SWEATER CHRISTMAS CARD

Whenever I get a chance to use 2d artwork, or some other medium in a project I get pretty pumped. Not only does it change-up the usual on my end, it can make the project stand out and have a bigger impact as well. 

A co-worker of mine (Mary Baugh, check her out on instagram @mbbaugh) has a few framed cross-stictched pieces hanging on her office wall and I was really impressed with the look. There is something about the texture and home-made quality of the type specifically that was very interesting. I liked how simplified everything gets and thought it would be a fun medium for a card of some sort.

DMDS (Daniel Mobile Dentistry Services) serves the elderly at retirement communities and nursing homes with much needed dental care. I had no idea how stressful appointments can be for some of the elderly. I just assumed most nursing homes had dentists or someone checking their teeth there. I didn't know many elderly don't get the proper dental care they need. Frankly, until I talked to Dr. Daniel, I didn't think elderly dental care was super important, and had no idea how serious a dental problem can be for an elderly person. Anyway, DMDS does some important, great work for the elderly and I thought an ugly sweater dental card would be a cool handout to their patients.

"Here's to a white Christmas" has a double meaning and would be a fun payoff for the inside. There it was, I liked the idea, but that typically doesn't mean much :). I mocked up the idea and got everyone on board for the project and off to the cross-stitching races Mary went. I created the layout in vector form for the front of the card and we tweaked a bit for simplicity. Mary got the pattern and once finished with the stitched piece, I was able to scan in the layout to the computer. I made a few small tweaks to the final scan in photoshop and after trips back and forth with the printer, the final product is below. I did frame up the actual cross-stitched piece as well and was excited to deliver that to the dental office with cards and envelopes ready to mail. 

ugly-sweater-cross-stitch-design-by-jordan-fretz-2.jpg
dentist-ugly-sweater-christmas-card-by-jordan-fretz.jpg
tags: christmas card design, christmas card, dentist design work, dentist christmas card, dentist christmas ideas, ugly sweater christmas card, ugly sweater holiday card, dentist holiday card, ugly sweater design, cross-stitch design, cross-stitch holiday card
categories: Graphic Design
Saturday 12.09.17
Posted by Jordan Fretz
 

COMMISSIONED ILLUSTRATION

Pretty sure this is the largest vector illustration request I have had. Ok, not every component was vector, but just about everything. I did use a bit of warping and mesh effects, but for the most part it's straight up illustrator components (brought in as smart objects) with a bit of blurring and brush work in photoshop.

Due to most all of this being pen tool drawing, the process is time consuming, but really rewarding as components fit together.

I started the project by just creating the background seats, overhead bins and floor. This helped frame the other elements that would be fitting into the space and shape the perspective of the layout. Next I started tackling the individual components: grenades, bazooka, cans, cups, non-smoking sign, etc. This helped me enjoy the process a bit rather than trying to bounce around and tackle everything at once, which may have been a little overwhelming and not as enjoyable. Then I moved on to finish the cart.

Truly wasn't looking forward to the stewardess' face, body position, etc. as that can be a bit tricky without great reference photos and it's hard to figure out exactly how far to take the tough-as-nails attitude/look. In the end I really enjoyed doing the facial features and hair as much as the other components.

digital-illustration-3.jpg
digital-illustration.jpg

When I couldn't find a photo reference in perspective, it was convenient my wife has glasses and could tilt her head in the correct position for me to refer to. I didn't want to use gradient after gradient in the layouts and instead tried to use more transparency and flat colors for the style. 

I will say using a Wacom tablet really is a game changer on something like this. I used the trackpad on my laptop for many of the items, but every time I was able to use the Wacom pen, it just seemed to move faster and avoid cramping. 

I went back and forth on sketching on top as an added effect to the final art, but the vector work really pops against the blurred background and I thought it best to leave it clean. The final version was printed on canvas (24"x36") and stretched on a frame.

The vector components really looked sharp and that enabled the text on her badge to be perfectly clear (one request from the start was to have the badge text be legible). The no-smoking sign on the cart and oxygen hanging down really ads to the theme and is my favorite part of the whole thing.

Anyway, I am pretty excited the way it all turned out and so was the client. Would welcome more of this type illustration sometime soon!

tags: illustration, vector illustration, digital illustration, digital art
categories: Digital Illustration
Saturday 12.09.17
Posted by Jordan Fretz
 

& THEN THERE WERE 3

Jackie and I couldn't be more excited about having our first kid. Maybe a little embarrassing for people to hear right when I found out, my mind pretty quickly went to thinking of what type of design would I do to announce it :). For me, drawing typography takes some time, a nice micron and a stress ball. Coming up with the concept for the layout probably my favorite part. Most designers, artists, creative people in general can draw out some letters, but the composition meaning itself is what makes someones layout really stand out. My concept was to symbolize myself, my wife and the baby using 3 main instruments and showing the instruments themselves in the final image. The Micron pen represented myself, the pencil Jackie and the crayon (which I was pretty nervous about the point screwing up the lines) was a good way to symbolize the baby. I was deciding between a few phrases that use the number "3" until I thought it would be cool to choose a phrase I could continue to keep doing in a series (as we have more kids Lord willing). "And Then There Were 3" seemed to fit and I started the sketching out some thumbnails. I liked a few different directions and almost went with a rocking horse making up the bottom of the "3", but something wasn't working and my wife agreed it wasn't right. Killed. Drew more thumbnails and went the direction of a mobile. There is something about a mobile that would be less in your face than a pacifier, bib or diaper. I like doing detailed drawings and paintings and while the type I thought shouldn't be overly complex, it would be fun to add details to the mobile elements. I started off drawing random, funny animals. But in the end Jackie loves birds and it just made more sense.

After sketching the layout full size on watercolor paper and refining, I took a needed eraser and tried to erase the dark lines so they wouldn't they wouldn't impact the watercolors too much. My plan was to use a gender neutral color (some kind of green) and contrast it with the Micron's black to really pop. I liked the way the flourish looked when it came out the bottom, but it seemed to crowd out the pen, pencil and crayon when placed on top, so I killed it. Next steps were to do the watercolor sections and then use the gray crayon to create the lines on top. 

I know I know, the kerning and letterforms of the text aren't perfect. Should I have slowed way down and done one word a day or practiced 10 more time, sure, but it's hand drawn and that's what makes it interesting. If I wanted sharp lines and perfection, I could have drew it in Illustrator or chosen a typeface, but instead I thought the hand drawn look fit the occasion better. The detail in the birds was a lot of fun.

I thought about trying to do 3 birds too, but then I thought I was screaming "3" at that point. They get it, 2+1=3. I did 6 birds. 3 have bowties and 3 have hair bows. Would many people notice, probably not, but I love that about art direction. I like having some details in there that I know are thematic and smart, maybe they get discovered, maybe they don't but if you ever do a deep dive looking at a layout, I want my best work to have something extra to realize. I figured if I turned the crayon to show the Crayola logo it would be more identifiable and I could tweet it at them or something. Anyway the final design is to the right. Some of the curves could be better, but I don't want to make the black slightly more round only to have the black way too thick and looking strange/lopsided.

While the top of the mobile turned out as I would have hoped, the crossbar in the first "H" is tilted after I had it right and then screwed it up. That bothers me, but I didn't want to alter any letters, drawings or mistakes in post. I felt changing them in photoshop vs. what the illustration actually looks like would be compromising the integrity of the piece. I want to fix it, but I can't!

baby-announcement-hand-drawn-type-by-jordan-fretz-final-layout.jpg

The final layout by itself seemed fine. Probably would get the point across and is simple enough, but then after some thought I experimented with some different environments too. I set it on a comfy blanket and thought we could position all kinds of baby stuff that relate to us around it. This way once I post the image, everyone would understand right away and it would stand out. Meh, it seemed to kiddy, too cute and I wasn't sold. 

The other idea was to just leave it on my art board. Sprinkle some paint tubes around and took the pic. I thought the image would just be a blog post, but the more I looked at it, the more I thought it worked. I paint, draw and design, this just makes sense to post as a new piece and tell everyone that way. Showing all kinds of baby stuff is done enough. Holding a chalk board and us looking at each other is fine, but we didn't want to do that. I wanted to create a simple layout that had some thought to it and I think this showed it off the best. 

All in all, it was a fun project. Having a baby is a big deal and this announcement will give it more justice than us just telling people. A few things I learned: slow down when drawing serifs and really keep the angle of the letters always in mind (I got off track way too much and went way too fast), incorporate things that have meaning even if not everyone will get it (the birds themselves since Jackie loves birds and the bow ties and hair bows on them to make 3 of each) and be very careful when a cat is around (Colby bent the paper a little in a corner and almost messed this up a couple times:).

tags: typography, typography announcement, baby announcement, baby announcement custom typography, custom typography announcement
categories: announcement design, typography
Friday 08.18.17
Posted by Jordan Fretz
 
Newer / Older

copyright jordan fretz design